Adding Multiple Facebook Tracking Pixels To Your Site with Google Tag Manager
Jared Law
December 4, 2018
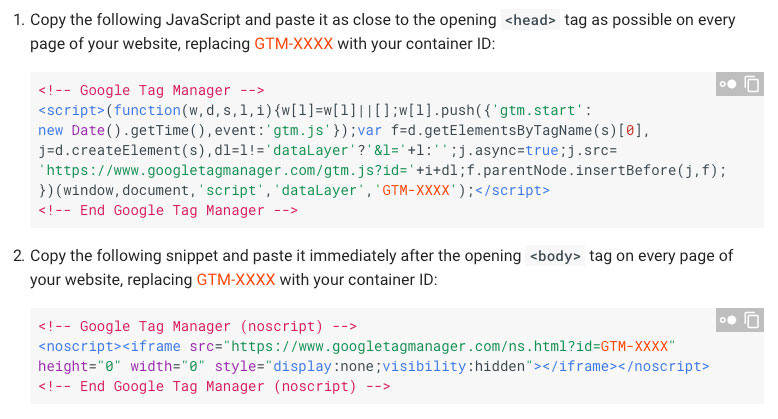
We often run into a situation where we need two different Facebook tracking pixels on a single website. This is typically the result of multiple Facebook ad campaigns running at the same time. To do this we utilize Google Tag Manager and a couple of custom tags and triggers.
Facebook Tracking Pixel
A tracking pixel is a bit of code that is placed on your website that allows you to better track interactions between your website and your Facebook page and ads. It consists of <script> and <noscript> tags that goes in the <head> of your website pages.
![]()
Google Tag Manager
Tag Manager is a Google service that allows an organization to manage all the different tracking scripts on their site through a single interface. The advantage of using Google Tag Manager is that it reduces the need for you to update code on your website when adding or adjusting the tracking code snippets. Instead, you simply need to add the Tag Manager script and it will then insert the necessary tracking scripts based on your configured Tags and Triggers.
Tags
Think of tags as the individual scripts that you need to appear on your website. Google Analytics tracking script is one tag and Facebook Pixel is another.
Triggers
A trigger is an event that “triggers” the tags to appear on your site. Tag Manager has a number of preconfigured triggers, the most commonly used is All Pages. The All Pages trigger would kick out your Tag on every page. You can also create custom triggers using different logic rules like when a page URL contains ‘x-y-z’ in the path. This type of custom trigger would fire when someone visits yoursite.com/x-y-z.
Adding a Facebook Tracking Pixel to Google Tag Manager
Getting a Facebook Pixel on your site is pretty straightforward. It doesn’t take long and Facebook even provides a clean little tutorial for it! Just follow their instructions and you will have it up and running in no time.
Checking That the Pixel is Installed and Working
After the pixel is installed you can use a handy little Chrome extension, Facebook Pixel Helper, to make sure that it is working. Once installed and enabled in chrome, simply visit your website and you should see the extension icon turn blue and indicate the number of Facebook tags being fired on your web page.
Adding a Second Facebook Tracking Pixel
Assuming you have the pixel installed and confirmed it is working with the Facebook Pixel Helper extension we are ready to make a few adjustments to add in the second pixel. To do this we will need to update the existing Facebook Tag with the new tracking id and add an additional trigger to your Google Tag Manager.
Update Facebook Tracking Pixel Tag
In Tag Manager click on the tag that you created for the Facebook Pixel to edit it. As we are adding in a second pixel, we just need to make a couple of slight changes.
Your initial code will look like the following:
<!– Facebook Pixel Code →
<script>
!function(f,b,e,v,n,t,s)
{if(f.fbq)return;n=f.fbq=function(){n.callMethod?
n.callMethod.apply(n,arguments):n.queue.push(arguments)};
if(!f._fbq)f._fbq=n;n.push=n;n.loaded=!0;n.version=’2.0′;
n.queue=[];t=b.createElement(e);t.async=!0;
t.src=v;s=b.getElementsByTagName(e)[0];
s.parentNode.insertBefore(t,s)}(window,document,’script’,
‘https://connect.facebook.net/en_US/fbevents.js’);
fbq(‘init’, ‘123456789012345’);
fbq(‘track’, ‘PageView’);
</script>
<noscript>
<img height=”1″ width=”1″ src=”https://www.facebook.com/tr?id=123456789012345&ev=PageView&noscript=1″/>
</noscript>
<!– End Facebook Pixel Code –>
- Add the second fbq(‘init’) code for the second account
Look for the section of code where the first fbq(‘init’, ‘123456789012345’); is called and paste the new tag ID below it. Your updated tag script should look like the following. - Add a second tracking pixel
In the <noscript> section paste the <img> tag from the second account.
Your updated code will look like the following ( updated code bolded for clarity ):
<!– Facebook Pixel Code →
<script>
!function(f,b,e,v,n,t,s)
{if(f.fbq)return;n=f.fbq=function(){n.callMethod?
n.callMethod.apply(n,arguments):n.queue.push(arguments)};
if(!f._fbq)f._fbq=n;n.push=n;n.loaded=!0;n.version=’2.0′;
n.queue=[];t=b.createElement(e);t.async=!0;
t.src=v;s=b.getElementsByTagName(e)[0];
s.parentNode.insertBefore(t,s)}(window,document,’script’,
‘https://connect.facebook.net/en_US/fbevents.js’);
fbq(‘init’, ‘123456789012345’);
fbq(‘init’, ‘234567890123456’);
fbq(‘track’, ‘PageView’);
</script>
<noscript>
<img height=”1″ width=”1″ src=”https://www.facebook.com/tr?id=123456789012345&ev=PageView&noscript=1″/>
<img height=”1″ width=”1″ src=”https://www.facebook.com/tr?id=234567890123456&ev=PageView&noscript=1″/>
</noscript>
<!– End Facebook Pixel Code →
Save and Confirm the New Tracking Pixel is Working
Save the script and publish your Tag Change and you can refresh your website and use Facebook Pixel Helper to make sure the new account tag has been added. If it is working you should see the number increase by 2 in the chrome extension icon.
Adding a Second Conversion Call
Facebook uses an additional script to handle conversion tracking. This script is only inserted on the page that you are considering a conversion point.
To keep things simple, let’s say you are running a Facebook ad that directs people to a special offer page on your site. You don’t care at this time if they use the offer but you want to know how much interest people have in it. In this example, your “conversion” would be people simply clicking on the ad and visiting your special offer landing page.
To track this conversion you can simply create a new trigger and tag in Tag Manager:
- Create a new Trigger
Trigger Name: My Landing Page Reached
Trigger Type: Page View
Some Page Views
Page URL > Contains > your-landing-page-slug - Create a new Tag
Tag Name: My Facebook Ad Conversion
Tag Type: Custom HTML
HTML:
<script>
fbq(‘trackSingle’, ‘234567890123456’, ‘ViewContent’);
</script>
Firing Triggers: My Landing Page Reached
The fbq(‘trackSingle’, ‘234567890123456’, ‘ViewContent’); is basically telling Facebook that a view content event happened and it should be tracked against the 234567890123456 account.
Save and Confirm the New Conversion Pixel is Working
Save the new trigger and tag in Tag Manager and then publish your changes. Once done you can visit the landing page mydomain.com/your-landing-page and check the Facebook Pixel Helper icon to confirm that the event is triggered and the new tag is being displayed. If your Pixel Helper Icon is showing 4 on your other pages, it should be showing 5 on your designated landing page.
So How Did It Go?
If you were able to follow along with the tutorial you should be in business and have not just one but two Facebook pixels working on your site. If you feel a bit lost or would rather have someone else handle this for you, give us a call and we will be happy to help out!