Does Google See Your Site as Unsafe?
Jared Law
August 15, 2017

Google and other search engines care about the security of their users. In an initiative that kicked off this year, Google Chrome, has begun setting boundaries on the security of websites. If your site content is being served over just HTTP (HyperText Transport Protocol) then it will be flagged as not secure.
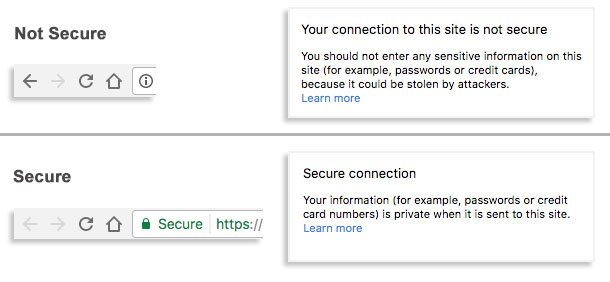
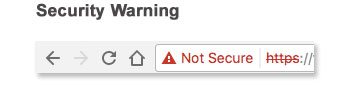
In Chrome, the URL bar provides immediate indication if a site is secure or not secure. A non-secure site will be displayed with an “i” for information icon. When this icon is clicked, it will show not secure connection dialogue.
In contrast, a secure site will display a prominent green lock icon and “Secure” next to your URL. If you’re interested in securing your site yourself, follow this step-by-step guide.
Which site would you rather visit?
How to Make Your Site Secure
Of course, the simplest way to ensure your site’s security is to contact Fuzzy Duck and our trained staff will take the necessary steps for you. Otherwise, if you’re a do-it-yourself type, feel free to follow the steps we have listed below.
First, you will need to acquire and install a security certificate (SSL certificate) from a qualified certificate authority. In many cases this can be done directly through your hosting provider’s account center or control panel. Once installed your site can be navigated over the secure HTTPS (HyperText Transport Protocol Secure) channel. Unfortunately, your work isn’t done just yet. You still have to test your site’s content and configure your site’s traffic to use secure HTTPS connection.
Step One: Test Your Site for SSL Errors
Once your SSL certificate is installed, you will need to test the content of your site to be sure it’s configured to also use HTTPS connection. A HTTPS web page that includes links to resources (images, stylesheets, etc.) that are not also over HTTPS will result in an error message within the URL bar.
Should your newly secured site experience this type of warning, you will need to make sure all of your images, scripts and styles are updated to use the HTTPS protocol.
Step Two: Configure Your Site to Force HTTPS/SSL
Once your site’s content has been tested and is showing the secure icon on each page, you can direct your site’s traffic to the secure URL. This is typically done through a few modifications to your server’s htaccess or web.config file.
Since Google sees HTTP and HTTPS sites as distinct in Google Webmasters, you will want to configure the forced redirect as a 301, also known as permanently moved. This will tell search engines that the content still exists, but is now permanently located at the HTTPS location.
It is always advisable to request a crawl from Google Webmaster tools, and to resubmit your sitemap once these changes are made. Once search engines crawl your site and see the change, they will update their index and search results to use the HTTPS version.
Step Three: Think Security Going Forward
Now that your site is being served securely, you should see more favorable search engine results and a higher sense of trust from visitors. Going forward, you will want to make sure that any image, script, style or content uses the HTTPS protocol. This will prevent accidental SSL warning messages on the content of your site.
Need Help Securing Your Site?
If the above steps feel a little above your technical comfort level, Fuzzy Duck is always here to help. Just contact us and we will get your site up and running securely.