Laravel Docker: Learning, Installing and Using
Jared Law
October 20, 2017

I have used MAMP (Macintosh, Apache, MySQL, PHP) for local development for many years, and I fully admit to liking it for its simplicity for general LAMP development (Linux, Apache, MySQL, PHP). However, we ran into a situation where we are developing an application with requirements that fall outside of the trusty old LAMP stack. In our case we need to run Nginx, PHP and MariaDB for our new development; that is where Laradock comes into play.
Laradock
Laradock is a full PHP development environment for Docker that has been tailored to Laravel. It has good documentation and a huge community supporting it. Although originally dedicated to Laravel development, the community support allowed it to also support other PHP projects such as WordPress and Drupal.
Installation
Getting Laradock up and running is pretty straight forward thanks to the documentation. There are few ways to work with Laradock based on whether it will be used for single project or multiple project developing.
I like the Docker approach to development, so I am going to be using it for a few projects that we are currently developing/maintaining. To accommodate this I decided to use Laradock for multiple projects.
Setting up Multiple Projects with Laradock
This guide assumes that you have Git, Composer, Docker and a Laravel project setup on your development machine. If you have not done so, please install and configure them prior to continuing on with this guide.
Step 1 – Clone Laradock into Projects Parent Directory
Using Terminal, navigate into your project’s parent directory and clone the repository using Git.
[well type=”” class=”code-terminal”]$ git clone https://github.com/laradock/laradock.git[/well]
After cloning completes, you will end up with a structure of:
[well type=”” class=”code-structure”]/laradock
/mylaravelproject[/well]
Step 2 – Configure Laradock/NGINX to Serve “yourproject”
As noted earlier, we need NGINX for our new project so we will need to go into Laradock/NGINX directory and create a site.conf file for our project.
Open laravel.conf.example and resave it as mylaravelproject.conf, replacing mylaravelproject with the name of your actual project folder. You will then need to edit a couple of the settings within the conf file.
For our example, we will want to access our Laravel project by visiting the URL “https://app.mylaravelproject.loc”. To do that we will need to change the “server_name” option within our mylaravelproject.conf file.
We also need to reference where our project files are within the nginx docker instance. To that we will want to adjust the root setting to “root /var/www/mylaravelproject/public”.
[well type=””]server_name app.mylaravelproject.loc;
root /var/www/mylaravelproject/public;[/well]
With those changes made you can save the file and proceed telling your machine where to find the app.laravelproject.loc domain.
Step 3 – Update Your Hosts File
Using Terminal, edit your hosts file to add your development domain. You can do this with the editor of your choice, I happen to prefer Nano.
[well type=”” class=”code-terminal”]$ sudo nano /etc/hosts
[/well]
After entering in your admin password you will be able to insert a new line into your hosts file.
[well type=”code-terminal”]127.0.0.1 app.mylaravelproject.loc
[/well]
Once inserted you can write out your file (control+w), confirm to save over and exit Nano (control+x).
Step 4 – Create .env File in Laradock
In Terminal, navigate into the Laradock directory and copy env-example to .env
[well type=”” class=”code-terminal”]$ cd laradock
$ cp env-example .env
[/well]
Step 5 – Fire Up Laradock and SSH In the Workspace
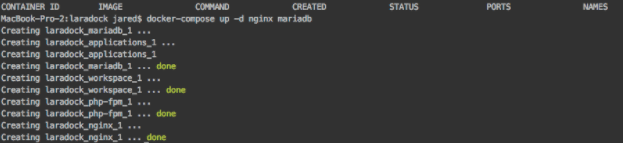
You should still be in the laradock directory within Terminal, from here simply run “docker-compose” command with your projects required Docker containers.
[well type=”” class=”code-terminal”]$ docker-compose up -d nginx mariadb
[/well]
This command will run the Docker file and get the containers set up. If this is the first time running docker-compose you may have to wait for Docker to download the necessary images. Initially this can take a few minutes, but once installed the startup process takes merely seconds.
Once the process has run, you should see a series of done messages.
Back in terminal you want to “SSH” into the Workspace container.
[well type=”” class=”code-terminal”]$ docker-compose exec workspace bash
[/well]
The concept of a workspace is a bit confusing for people new to Docker. The best way I have found to describe the concept is to think of the workspace as an alias or magic symlink that ports your working directory into a server’s var/www directory.
Don’t worry you will still be making changes to your local files normally in whichever text editor/IDE (Integrated Development Environment) you prefer.
Step 6 – Connect to MariaDB and Create Your Database
You can connect to your database in a number of ways. I prefer to use NaviCat for most of my development, but you could also run phpMyAdmin with MariaDB in your Docker setup if you prefer.
Connecting to MariaDB with phpMyAdmin
*Please note, you will need to modify comment out the depends_on attribute of phpmyadmin in the Laradock/Docker-compose.yml file to start phpMyAdmin with MariaDB.
If you already have Docker running you will want to first bring the containers down. From Terminal, outside of your workspace run “docker-compose down”.
[well type=”” class=”code-terminal”]$ docker-compose down
[/well]
Then bring it back up and include phpMyAdmin.
[well type=”” class=”code-terminal”]$ docker-compose up -d nginx mariadb phpmyadmin
[/well]
Once the containers are running again you can access phpMyAdmin in your browser by going to https://localhost:8080
Connecting to MariaDB with Navicat
The connection information is located in the laradock/.env file you created earlier in step four of this guide. Open that file and search for MariaDB to view the connection information.
Open up Navicat and add a new connection with the below information.
[well type=””]Connection Name: LaradockMariaDB
Host Name / IP Address: localhost
Port: 3306
User Name: root
Password: root
[/well]
Once connected, simply create the database with the charset and collation that your project needs.
[well type=””]Database Name: mylaradockproject
Default Charset: utf8mb4
Default Collation: utf8mb4_unicode_ci
[/well]
Step 7 – Connect Your Laravel Project to MariaDB
In your text editor/IDE, edit your mylaravelproject/.env file to connect to the newly created MariaDB.
[well type=””]DB_CONNECTION=mysql
DB_HOST=mariadb
DB_PORT=3306
DB_DATABASE=laravelboilerplate
DB_USERNAME=root
DB_PASSWORD=root
[/well]
From here you can either import your projects data via phpMyAdmin/Navicat, or run PHP artisan migrate in Terminal from within your workspace. Review and follow step 4 if you are not already SSH’d into the workspace.
[well type=”” class=”code-terminal”]$root@695ebcb471f9:/var/www/mylaravelproject# php artisan migrate –seed
[/well]
*Please note that the –seed command is an option, it populates your database with installation data that may come with your distributed Laravel project.
Step 8 – Check the Install in Your Browser
Open up your browser and go to the URL you chose and configured in steps two and three (https://app.mylaravelproject.loc). If everything is setup correctly your project should be running and you should see your home page.
Happy Coding Because, Ding – We’re Done
That’s it, you are now ready to get going with your development. You can add additional Laravel projects to Laradock by installing them in your working directory and then following along in steps two through eight.
While it may seem like a lot, you can really move an existing project into the Laradock process within a couple of minutes. I was able to move four other Laravel projects into this Laradock working scenario within 15 minutes. Plus, if one of the project needs Apache, Redis or any other server technology packaged with Laradock, it is as simple as changing your docker-compose up command to include them.